Showing posts with label clash. Show all posts

Wednesday, February 21, 2018

Clash of Monarchies: The Third War of Italian Independence

The last of the three wars to secure the unity and independence of the Kingdom of Italy requires more than the usual background information. The preliminaries took longer than the war itself. The Second War of Italian Independence had seen the Austrian Empire beaten by the French and Italians at the bloody Battle of Solferino in 1859. Austria was forced to cede Lombardy to the King of Piedmont-Sardinia as well as the conquest of Modena, Parma, Tuscany and most of the Papal States in 1860 which were united with the rest of the northern half of the peninsula under the House of Savoy of the Kingdom of Piedmont-Sardinia. However, the French ultimately won few friends and, by the time the smoke had cleared, came to be seen as duplicitous by both the Austrians and many Italians. Moreover, the Prussians had mobilized during the conflict but had not taken part. They too were pursuing a nationalist goal of reunifying all of the German states into one empire (Reich). Austria, rather than lead, stood opposed to this and the war in Italy was used by the Prussians as proof of both Austrian weakness and a greater concern for maintaining their rule over non-Germans than for resuming leadership of the German nation on the part of Austria.

Franz Joseph, Wilhelm I, Vittorio Emanuele II
All of that was simmering and would ultimately come to a boil when Bismarck was to provoke Austrian Emperor Franz Joseph into a war (just as Napoleon III had done in 1859 and others would do yet again). In the meantime, however, the unification of the Italian peninsula continued apace and in a shocking way. The famed Italian nationalist, Giuseppe Garibaldi, renowned for his exploits in South America and his defeat of the French in front of Rome in 1849, was as eager as ever to go on the attack. In 1849, Garibaldi, a lifelong republican and Freemason, had fought for the radical republicans of Giuseppe Mazzini. However, he had seen them prove totally incapable of governing and witnessed how easily they were defeated. Since then, he had seen King Vittorio Emanuele II and his royalists, deliver actual victories for the nationalist cause and Garibaldi was that rare case of a nationalist who did not put his own ideology before all else. If the republicans, who he favored, could not get the job done, he would fight his battles on behalf of a monarch if that meant the furtherance of the nationalist cause. However, given his background, his politics and his aggressiveness, the government of King Vittorio Emanuele II, led by Count Camillo Cavour, had to be careful in how it dealt with Garibaldi, to make use of him while not being seen too blatantly to make use of him in case his far-fetched scheme might fail.

The scheme he had in mind was nothing short of the conquest of the Kingdom of the Two-Sicilies, ruled, at that time, by the cadet branch of the Spanish Royal Family. In May of 1860, with only a thousand volunteers, Garibaldi sailed out to take on the Bourbon monarchy which possessed a large army and a bigger navy than Piedmont-Sardinia. He and his little force of men, garishly dressed in red shirts, landed in Sicily, the garrison of which had been reinforced from 21,000 to 40,000 men when word of Garibaldi’s plan reached Naples. Garibaldi should have had no chance at all, however, he was a master at misdirection and the Kingdom of the Two-Sicilies proved far less formidable in fact than it appeared on paper. Particularly in Sicily, the repeated rebellions of the previous decades had taken their toll and the King, Francesco II, had wiped out his Swiss mercenaries, his best troops, when they went on strike over better pay and conditions.

Battle of Calatafimi
Garibaldi could never have conquered Sicily with only a thousand men but many Sicilian peasants rushed to join his cause and more reinforcements would be arriving by ship later on. The first decisive action was the Battle of Calatafimi on May 15, 1860. If the Neapolitans had beaten Garibaldi there, he would have been ruined and his local support would have melted away. Yet, though outnumbered 3-to-1, Garibaldi managed to win, or at least not lose which was good enough for his purposes. Emboldened by this, and attracting a little over a thousand more local volunteers in the aftermath, Garibaldi launched a direct assault on the coastal fortress city of Palermo. He let prisoners out of jail which enlarged his forces and had little trouble rousing the city to rebellion (Palermo had a history of this) but the Neapolitan general, the elderly Ferdinando Lanza, managed to drive them back after which he and his offshore naval support shelled the city for three days, killing hundreds of civilians. This, obviously, did nothing to help the Bourbon cause in the long-run. Many have since accused Lanza of having been paid off by the British but I would be hesitant to believe such a thing without hard evidence. He did surrender the city to a force smaller than his own and which was practically out of ammunition but he did so only after his own counter-attack had failed. The enemy were in the city and it seemed impossible to dislodge them. He also had permission from his King to withdraw and on July 7 the Neapolitan army did just that.

Garibaldi & the King meet at Teano
Earlier that month King Francesco II had granted a(nother) constitution but it did him no good. Those who wanted one no longer believed the Bourbon monarchy trustworthy on this subject while the more reactionary supporters of the monarchy were put off by it. After Garibaldi’s forces won another victory at Milazzo, the Neapolitan commander surrendered the key fortress city of Messina less than a week later. The remaining Neapolitan garrisons on the island surrendered soon after. Garibaldi was master of Sicily and controlled access to the mainland. The next month he and his forces crossed over to Calabria, against the direct wishes of Cavour who had conspired with Garibaldi to make the invasion of Sicily possible. In Calabria there was little effective resistance as the large Bourbon armies simply melted away, many simply deserting and not a few even crossing over to join Garibaldi. In the meantime, the Piedmontese had invaded the remaining Papal States on the pretext of suppressing disorder. Pope Pius IX deployed his own army but held them back, certain that France or Austria would come to his aid. Neither did. Further south, the gallant, young, King Francesco II barricaded himself inside the coastal fortress of Gaeta with his few remaining loyal troops. The Piedmontese army and the army of Garibaldi linked up with Garibaldi handing all of his conquests over to King Vittorio Emanuele II of Italy. The siege of Gaeta dragged on to its inevitable conclusion, showing at least what an inspiring leader King Francesco II was and what he might have accomplished if he had taken to the field to defend his kingdom personally.

After 100 days of resistance, Francesco II surrendered and went into exile, the south was reunited with the north for the first time since the fall of the Roman Empire and Vittorio Emanuele II was proclaimed King of Italy. Of the major Italian territories, only Rome and Venice remained out of reach. Rome was occupied by the French and Venice by the Austrians. Peaceful efforts to gain these came to nothing. The new King of Italy offered to purchase Venice from Emperor Franz Joseph, but was refused. Likewise, Pope Pius IX refused to hear of the offer of Cavour for absolute sovereign immunity for the pope and total power for him in all Church matters. The status quo, however, could not endure as the nationalist movement which had taken hold in Italy would never abide separation from Venice and Rome. Not long after, Count Cavour suddenly died and though the King had never liked him much, the two had learned how to work together and a period of some political instability ensued. Garibaldi, seeing his work still unfinished, recruited some more volunteers and made to attack Rome. The French and Austrians both threatened war if he was not stopped and so the Italian army did the job, halting the nationalist volunteers at the Battle of Aspromonte in August of 1862, even wounding Garibaldi himself in the process.

King Wilhelm I & Bismarck
This was what we would call today a public relations nightmare for the Italian government and to an extent broke the nationalist-monarchist coalition. The royalists accused the nationalists of being rash and foolhardy while the nationalists accused the King of caring more for the Pope than for Italy, taking the side of the French occupiers over the Italian people. All of this added pressure on the new Kingdom of Italy to take any chance that presented itself to regain its nationalist credentials. The government saw hope for regaining Venice when, also in 1861, Otto von Bismarck became chancellor of the Kingdom of Prussia. Bismarck was well known as a man who was determined to have a united Germany and if Austria would not lead, he would push them out of the way and Prussia would assume leadership. However, when Napoleon III proved not so positive toward Prussia and negative toward Austria as Bismarck had hoped, Prussia and Austria renewed ties under the German Confederation (just in time for a war with Denmark). Italian hopes for an alliance were dashed, but the reunion did not last long.

Conflict began to bubble up over disagreements between Austria and Prussia over the administration of the lands taken in the war with Denmark. Among German nationalists, there had also been a long standing division over whether or not the united Germany would include Austria due to the fact that Austria also ruled over so many non-German peoples that German nationalists cared nothing about. With the Austro-Prussian dispute, that matter was settled; Austria would be excluded and, as far as Bismarck was concerned, could go on having fun in her ‘majority minority’ empire. If Prussia were to take on Austria, there would be no better time as Habsburg foreign policy had managed to alienate just about everyone by this stage. Austria was sore at the French for allowing the incorporation of the central Italian states into the Kingdom of Italy and so, naturally, the French were sore at Austria in return. The Italians, naturally, wanted Venice back and so were certainly not going to take the side of Austria and, most importantly, the Russians were still furious at Emperor Franz Joseph for threatening to side against them in the Crimean War, effectively forcing them to concede defeat. The Prussians had also stood by the Russians in a recent rebellion in Poland, whereas the Austrians had not. The British, for their part, had no great love for either side and had no reason to care who won.

Bismarck, von Roon & von Moltke
Bismarck had only to prod Austria with the right words for Emperor Franz Joseph to demand a resolution of the Holstein issue by the German Imperial Diet which violated a treaty between Austria and Prussia, which was all Bismarck needed to go to war. Many have since pondered why the Austrian Emperor did such a thing after having been previously baited into a failed war with France and Piedmont-Sardinia not so long before. The most common explanation is that Austria was still not really looking toward the German states so much as the other ethnicities within the Austrian Empire, which were rather restive. The Hungarians, who had come under much more strict control since the Revolution of 1848, were looking particularly troublesome. The Emperor may have been hoping that a war with Prussia and Italy would unite the ethnic groups behind Austrian leadership and strengthen the empire.

In any event, on June 14, 1866 the war began with Prussian troops marching into Saxony and Bohemia. The Prussian army had mobilized rapidly thanks to the adept leadership of war minister Graf von Roon and the army commander Graf von Moltke. The Italian Royal Army was less well prepared, with elements of the north and south still not having coalesced very well. Some of this was due to personality issues, some due to organizational differences and sometimes simply the differences between the dialects of Turin and Naples. The Italian war plan was for the army of General Alfonso La Marmora to strike while the army of General Enrico Cialdini remained on the defensive. They would have superior numbers but the Austrians, with their powerful fortress cities of the Quadrilateral, would be able to concentrate their troops against any threat. The Italians, in typical fashion, came straight on with a bold offensive by the troops of La Marmora, accompanied by King Vittorio Emanuele II himself, who loved nothing better than being on campaign.

Archduke Albrecht
The Austrians were led by Archduke Albrecht, Duke of Teschen, the Emperor’s cousin and a veteran of Radetzky’s victorious army from the First War of Italian Independence. He was not content to remain on the defensive but moved his army around to the north in an effort to get behind the Italians, cut them off from their base of operations and assault them from the rear. As it happened, the Italian army turned at just the right moment and the two sides collided at the Battle of Custoza on June 24. It was a very confused fight. The Austrian cavalry charged in, were mostly wiped out but spread confusion that stymied a sizeable number of Italian units. The Austrians drove the Italians out of Oliosi and seemed to be winning the day, yet were then met by an Italian division that exploited the gaps in their lines and refused to be dislodged, repelling fierce and repeated Austrian attacks at Monte Croce. The Austrians thought they were beaten, yet the Italians did not immediately reinforce Monte Croce and finally the forces there began to fall back. When reinforcements were sent and the Austrians moved to match them, the Austrians left another gap in their lines but the Italians failed to exploit it.

The Battle of Custozza
Each army believed they had been beaten, though neither actually had been. However, it was La Marmora who was the first to take action on this mistaken assumption and he ordered a retreat. As his forces moved back to secure the bridges over the Mincio, gaps in the Italian lines opened up which the Austrians were quick to exploit and Italian losses were heavy. By the end of the day, the Italians had retreated across the river after losing 8,147 men compared to losses of 5,650 for the Austrians. However, Archduke Albrecht did not follow up to destroy the Italian army, viewing his army as too bloodied and too exhausted to continue. As it was, most of the Italian losses had been men who were captured, as far as the number of dead and wounded alone went, Austrian losses were considerably higher. The Archduke retired to Verona, fearful of exposing his forces in case the French decided to get involved. Emperor Franz Joseph had advised him to ignore any political consideration and focus on annihilating the Italians, however, Archduke Albrecht seemed more concerned in not repeating the disaster that had befallen Franz Joseph himself at Solferino. As it was, Austria had won a solid victory and removed itself from immediate danger on the Italian front.

Battle of Bezzecca
In fact, the Austrian Empire seemed to be doing exceedingly well in the opening weeks of the conflict. They had defeated the Italians at Custoza and soon after halted the Prussians at Trautenau and the Austrian-allied forces of the Kingdom of Hanover also defeated the Prussians at Langensalza. However, at that point, everything began to go wrong. Only two days later the Hanoverians surrendered and the Prussians bested the Austrians at Gitschin on June 29. Most devastating of all for Austria was the decisive Prussian victory at the Battle of Koeniggraetz (Sadowa) on July 3. Subsequent defeats followed and in Italy, a small force under Giuseppe Garibaldi, who was still full of fight, was on the attack in the Trentino while the Italian high command planned their own counter-offensive. On July 21, Garibaldi and his “Hunters of the Alps” were attacked by two Austrian columns led by Major General Franz Baron von Kuhn at the town of Bezzecca. The Italians immediately counter-attacked and though they took heavier losses, managed to drive the Austrians out, providing a much needed morale boost for the Italian forces.

Battle of Lissa
The Italian war effort seemed to be on the rebound. General Cialdini was on the advance, this time with La Marmora holding back to cover the Austrian fortresses, Garibaldi had won a hard fought victory at Bezzecca and the Italian navy, widely regarded as the vastly superior force, was preparing to land troops on the Adriatic island of Lissa off the Dalmatian coast. However, it was then that everything was spoiled by the greatest disaster of the war for Italy. To the surprise of all, the much smaller Austrian fleet of Admiral Wilhelm von Tegetthoff, attacked the Italian fleet while they were preparing to land their forces. The Italian commander, Admiral Count Carlo di Persano, was caught off guard and seemed totally bewildered. Two Italian ironclad warships were sunk while the Austrians lost none of their own, though one unarmored steamer was badly damaged. The Italians retreated and the Austrian sailors cheered. Ironically, most of the “Austrian” sailors were actually Italians, from Venice. It was a humiliating blow for Italy which was not helped by the fact that Persano first reported that he had won a great victory. This made it very awkward, needless to say, and all the worse when the truth came out.

The outcome of the war had, for all intents and purposes, mostly been decided at the Battle of Sadowa with the Prussians crushing the Austrian army there. However, the Austrian reinforcements on their way to Italy, combined with the stunning loss at Lissa, prompted Italy to come to the peace table too, in spite of the advances of Garibaldi and Cialdini and the hopes riding on them to make good on the loss at Custoza. It was not the glorious victory that had been hoped for, nor would the resulting peace treaty be easy for anyone. Italy was on the winning side but Prussia had been the ones to force Austria to the negotiating table. Even then, it was only thanks to the intransigence of Bismarck as most of the Prussian officers wanted to carry on and capture Vienna and perhaps more. Bismarck would not hear of it. All he wanted was a war to shove Austria out of the way so that Prussia could create a united Germany. He had no desire to see Austria humiliated or destroyed.

King Vittorio Emanuele II enters Venice
However, the Austrians were still Austrian and while they could grudgingly accept being beaten by Prussia, they would still insist on being condescending to the hated Italians. They refused to concede anything to Italy, yet Prussia was bound by their alliance not to make peace unless Venice was restored to Italy. However, the Austrian Empire refused to budge on this and so Prussia and Italy had to turn to Emperor Napoleon III of the French, who had been on side but taken no part in the conflict. The result was rather ridiculous. Austria finally agreed to make peace but by ceding Venice to the French Empire at which point the French then handed Venice over to the Kingdom of Italy. In a way, however, it was rather fitting given that Austria had first acquired Venice by originally dividing the Venetian territories with the first French Republic. So it was that Prussia proved to the minor German states that Austria would not be looked to for leadership and, after the appropriate referendum, Venice was annexed to the Kingdom of Italy.

An unfortunate result of the Austrian intransigence during the peace process was to perpetuate the false impression that Italy had accomplished nothing during the war. The Italians had won battles and the naval engagement of Lissa was the only truly embarrassing loss. The battle of Custoza was two armies that basically fought each other to exhaustion, both thought they had lost and the Italians were simply the first to do anything about it and as they began to pull back the Austrians pounced. Garibaldi had won a hard fought victory in the north, the Italians had not been destroyed and were in the process of counter-attacking, were advancing back into Venetia, when the crushing victory of the Prussians brought the war to a close. The Austrians had not ‘run away with it’ so to speak. In any event, Italy had at least regained Venice, leaving only Rome still under foreign occupation. Prussia was clearly established as the leading German state, only one further step away from unification whereas the Austrian Empire had been humbled and was soon thereafter forced to make vast concessions to the Hungarians, leading to the compromise which turned the Austrian Empire into the “Dual Monarchy” of Austria-Hungary.

Monday, September 18, 2017

Clash of Monarchies: The Second War of Italian Independence

The Italian peninsula, after so many centuries of division and foreign rule since the fall of the Western Roman Empire, would ultimately fight three wars for independence but of these three, none would be so consequential as the second. The first had seen the hope of the existing Italian princely states, Papal, Bourbon and even Habsburg, come together under the leadership of the House of Savoy against the Austrians with the possibility of confederation or federal unity for Italy only to be defeated by the Austrian army of the unflappable Graf von Radestky. King Carlo Alberto of Piedmont-Sardinia, after his defeat, abdicated in favor of his son King Vittorio Emanuele II a monarch who was originally interested only in the unification of northern Italy and that mostly so as to prevent it from occurring under the leadership of the radical republicans. However, with cooperation from the other Italian states now out of the question, he knew he would have to look for an ally against the Austrian Empire. Such an ally was to be found in the person of Emperor Napoleon III of the French.

Vittorio Emanuele II, Napoleon III & Franz Joseph
One benefit the Savoy monarchy had was that the radical republicans had been, in 1848 and after, thoroughly discredited among Italian nationalists. They had failed and in Austria, the Papal States and Naples, reactionary forces had revived in a harsh way. This meant that the Savoy, careful to keep on the side of the nationalist spirit, was looked to for leadership while the republican crowd of Mazzini was discredited. Aside from the King, the most important player on the Savoyard side was his prime minister Count Camillo di Cavour. For Cavour, nationalism was a means to an end rather than an end in itself. His goals were for the financial independence of Turin from British banks, the furthering of industrialization and economic expansion. Ties with British banks were cut, new ties with French banks were established, railroad construction exploded and trade increased. The army was improved as well and in 1855 the Piedmontese participated in the Crimean War as a way of gaining British and French support against Austria. The result was a Savoyard army that was better organized, more easily mobilized, with a better staff system and with greater combat experience.

Obtaining an alliance with France, however, proved rather difficult. The French were willing but Napoleon III extracted a heavy price for his support which included the Savoy ceding their own heartland, the Duchy of Savoy as well as the County of Nice to France. The King also had to give his daughter, the petite Princess Clothilde, to the hulking Prince Jerome Bonaparte, the French Emperor’s cousin. In exchange, France would support the end of Austrian rule over Lombardy and Venice and the creation of an independent Kingdom of Italy on the northern half of the peninsula. This was, however, a defensive alliance and would only take effect if Austria attacked Piedmont. In Naples, the Kingdom of the Two-Sicilies did not figure into the issue. While still possessing a powerful army, it was geared entirely toward suppressing the local population, which had proven very prone to rebellion, and not to defending against foreign invasion. An alliance was proposed between Turin and Naples but King Francesco II of the Two-Sicilies had rejected it out of hand. They would play no part in the ensuing conflict.

Austrian Imperial Army, 1859
The French, more so than the Piedmontese, also took care to ensure that there would be no unwelcome intervention on the part of the Russians. This was not a problem as the Russians were feeling in no way sympathetic to the Austrians. Perhaps even more than the powers that fought against them, the Russians blamed Austria for their defeat in the Crimean War and were particularly bitter given that they had aided the Habsburgs during their time of greatest peril in the Revolutions of 1848. They also did not tend to view Austrian rule over northern Italy as legitimate anyway, going all the way back to the French Revolutionary Wars, Russia’s Czar Paul had been very disappointed by the British and Austrians keeping territory they took from the French rather than restoring it to its previous rulers, be it Malta or Venice. The British could also be counted on to remain on the sidelines given that they had good relations with France (for a change) and had been quite offended by the harshness of Austrian rule in Lombardy-Venetia. Paris and Turin were convinced that they could handle Austria between them and all that was necessary was for Austria to fire the first shot.

The Austrian Empire had come very near to total collapse in the Revolutions of 1848 but, thanks to the leadership of their new, young Emperor Franz Joseph and the victories of Graf Radetzky, they had weathered the storm and the Austrian Imperial Army seemed all the more robust and formidable. Austria did become a constitutional monarchy but it was a constitution that the Emperor accepted on his own terms and he pursued a policy since labeled “neo-absolutism”. There were problems though due to rivalries in the military leadership and a financial crisis which greatly effected military readiness. The politicians in Vienna always seemed prepared to sacrifice spending on the army before anything else and this meant that Austria could not maintain so large an army, or armies, on the Italian peninsula and, in the event of major trouble there, would have to divert forces from elsewhere in the empire if they were to maintain an overwhelming superiority. The Austrian Empire had also simply become overstretched. Aside from their own frontiers to the south and east, garrisons to keep troublesome populations in line within the empire, the Austrians had also been called upon to safeguard the Papal States and the Spanish Bourbons in Naples as well as their own Italian possessions. It was simply too much, particularly with a less than robust economy. The desire of Emperor Franz Joseph to reassert Austrian leadership in Germany also meant that neither Berlin or Moscow were, at the time, looking too favorable toward Vienna.

Officers of the Savoyard army
The French and Piedmontese, on the other hand, were well prepared with a joint-plan for military cooperation in the event of war and the Piedmontese economy was booming. It was the perfect time for a war but it could only happen if Austria made the first aggressive move. Count Cavour, therefore, entered into a number of schemes to encourage trouble in the central duchies such as Tuscany and Modena, nominally independent but ruled by junior members of the House of Habsburg. The famous nationalist revolutionary Giuseppe Garibaldi was also recruited to lead volunteers in the cause of Italian independence under the Savoy banner. This caused nearly 20,000 Italians to rush to Turin to volunteer, fired by nationalist zeal, so many that Cavour had to suspend his plan before things went off prematurely. The point was for the trouble in the duchies to draw Austrian strength away from Lombardy-Venetia and the government in Turin knew perfectly well that the government in Vienna would blame them for any Italian nationalist unrest and thus the Austrians would be encouraged to attack Piedmont-Sardinia.

King Vittorio Emanuele II also ordered the mobilization of his army, at least gradually, which was sure to attract Austrian attention. The Austrians were certainly alarmed but also unsure how to respond. The Piedmontese had not actually made any aggressive move and a full mobilization of the Austrian Imperial Army was a costly exercise Vienna would wish to avoid if not strictly necessary. The Italians also had to be fully prepared before the war started given that, as per the agreement, they would be responsible for both paying for the French intervention on their behalf and keeping both armies supplied during the war, which would be no small task. The French also began moving their forces into position which alarmed the Austrians all the more. In April, 1859, however, everything almost came to ruin when the British government proposed an international congress to deal with the Italian situation. Thankfully, France and Italy were rescued by their Austrian adversary. Emperor Franz Joseph had sought out the retired elder statesman, Prince Klemens von Metternich, who immediately understood that the French and Italians were trying to provoke Austria into a war and he advised the Emperor that, whatever he did, do NOT send an ultimatum to Turin. The young Kaiser sheepishly had to admit that he had already sent one out.

Kaiser Franz Joseph of Austria
The ultimatum ordered the King to demobilize his forces or face war and this message was immediately forwarded to Paris. The French and Italians had their threat and could take action in a war of self-defense against Austrian aggression. Lest anyone think that Emperor Francis Joseph was being purely hot-headed in this blunder, he had expected such a conflict to rally the German states in support of Austria. Unfortunately for him, they did not. The Prussians were not sympathetic, seeing the Austrians as rivals with a bizarre obsession with non-Germans and the other states often did not see Austria as a “team player”, partly also because they were necessarily focused on their rebellious non-German territories. They also saw no reason for Austria not to accept the proposal for a congress rather than giving the Italians exactly what they wanted, which was a war. Emperor Francis Joseph, however, feared that any such congress just might say what many Italian nationalists had been saying for ages; leave Italy to the Italians and everyone mind their own business. Austria simply had no real friends at this point and so would have to stand alone. Emperor Francis Joseph, for good or ill, was prepared to and after the Italians did not respond to his ultimatum, issued the declaration of war on April 29, 1859.

Feldzeugmeister Franz Graf Gyulai, commander of the Austrian Second Army in Lombardy, believed that his forces would have at least two weeks to crush the Italians before the French could intervene. He had on hand some 110,235 soldiers as well as another 59,000 deployed throughout Lombardy-Venetia to suppress any popular uprisings. The Italians could field only 77,348 men to meet them, however, they were very efficient and led by men who had learned from the mistakes of 1848. The Franco-Italian leadership had also carefully worked out the train schedules and necessary stockpiles of supplies to move the French into northern Italy as quickly as possible. The Austrians had previously assumed the French were not prepared to move because they had not been stockpiling supplies. However, this was because it had been left to the Italians to handle the logistics and, in the end, the French army was transported quickly with ample stores by the very efficient Piedmontese rail network.

General Alfonso La Marmora
Unfortunately for the Austrians, Gyulai was no Graf Radetzky and no one knew this better than Gyulai himself who was more of a desk general. He had asked to be reassigned but this was refused. With the outbreak of war, his plan was to crush the Italians with his superior numbers and by then be able to take up a good position from which to deal with the French. He would march directly on the Piedmontese capital at Turin. Of course, this is exactly what the Italians expected him to do and the Piedmontese army was deployed to block any such advance and hold up the Austrians until the French arrived at which point they would work together to drive the enemy from Italian soil. The Italian commander, General Alfonso La Marmora was under no apprehension that this would be easy but he was aided by the extensive spy network set up by Lt. Colonel Giuseppe Govone, his chief of military intelligence, who had a constant flow of information on the movements of the Austrian army. La Marmora deployed his five infantry and one cavalry divisions to be in a position to block the advance on Turin and to be able to link up with the five French Corps at their places of deployment which, when they arrived, would be set up to pin down the Austrians at the Dora Baltea line and then, with three of the French Corps coming from Genoa to Alessandria, to threaten the Austrian flank.

Austrian naval strength was negligible, being about as large as the Piedmontese navy, far outmatched by the French fleet which was the second-largest in the world. In any event, the commander of the Austrian navy, Archduke Ferdinand Maximilian, had prepared only for the defense of the Adriatic and had no plans for offensive operations (and keeping in mind most of the sailors in the Austrian navy were Italians). As such, by rail and by sea the French were able to move their forces into Italy rapidly and freely. The Austrian army, likewise, inexplicably remained in place for days while their enemies massed against them. Gyulai claimed that Vienna had ordered him to wait while in Vienna they blamed Gyulai for not seizing the initiative. It is difficult to know who was in the right but it does seem that, having blundered into giving the Italians the war they wanted, Emperor Franz Joseph hoped, at the last minute, to be able to negotiate a solution or for the German states to rally in support of Austria. Of course, neither would be the case nor were such hopes frankly realistic. By May 1, with French deployments proceeding as scheduled, General La Marmora remarked to the commander of the Third Division at Novi, General Giovanni Durando (commander of the Papal Army in the First War) that the Austrian advance was “molto lentamente” (very slow).

Feldzeugmeister Gyulai
The Austrians had their spies too and they reported to Gyulai on the movements of the French army which seems to have intimidated him as they tended to exaggerate French strength. He was unsure of how to deploy his own forces for fear of where they would be when the French reached their own destinations. As it turned out, it was ten days from the time of the ultimatum until Gyulai moved, very slowly, toward Vercelli. King Vittorio Emanuele II, who was in his element on such occasions, wanted to stick to the original plan but the French convinced him to redeploy Franco-Italian forces away from Turin. He did so and, as it happened, a determined Austrian advance would have found little more than one Piedmontese cavalry division blocking their way if they had driven on for the capital but the Austrians were convinced that the French were planning to flank them from the south and so began to pull back. The danger to Turin dissolved faster than it had appeared.

By May 12 the Emperor Napoleon III had arrived in Genoa. Armed with some thoughtful advice from retired General Baron Antoine-Henri Jomini (a veteran of his famous uncle’s army), Napoleon met with King Vittorio Emanuele II at Alessandria to work out their offensive against the Austrians. It would be too much to say the Franco-Italian forces took the initiative from the Austrians as the Austrians never seemed to have held it in the first place but Napoleon III and Vittorio Emanuele II were certainly willing to seize it where it lay. They did, however, pass up an opportunity to strike the Austrians while Gyulai was redeploying his forces but an overall strategy was still being well executed. The famous Giuseppe Garibaldi, given rank as a Lt. General in the Piedmontese army after pledging allegiance to “Vittorio Emanuele and Italy”, was to harass the Austrian right, brushing the Alps. He had originally intended to lead the effort to foment unrest in the central duchies but this job was instead given to Prince Jerome Bonaparte and his French troops, which was deemed preferable to the authorities in Turin as Garibaldi, a lifelong republican and former Mazzinian, was still not regarded as being sufficiently loyal to the Savoy monarchy to be absolutely trusted. Garibaldi in the north and Prince Jerome in the south would threaten the Austrian position from the left and right, they would be intimidating but not part of the major action.

French line infantry
As the French First Corps moved on Voghera, the Austrians thought this the first move in an effort to get around behind them and the Austrian IX Corps under Field Marshal Lieutenant Karl Urban was deployed to stop them. The result was the first engagement of the war that was more than a skirmish, the Battle of Montebello on May 20 between the lead French division of General Elie Frédéric Forey and elements of the Austrian V Corps under General Philipp Graf von Stadion which had been sent in to support Urban. Three Italian cavalry regiments, the Aosta, Novara and Montferrato, also participated. Despite being considerably outnumbered (3 to 1), Forey fought an aggressive action that made Graf Stadion believe that the French had more support behind them, prompting him to retreat and give the victory to the Franco-Italian forces under Forey. This sharp rebuke made Gyulai all the more reluctant to take risks but as he had initiated the action, it also made Napoleon III nervous that the Austrians might be trying to take back the initiative. As it was, Gyulai had been concerned about a move south and his forces had met the enemy so he continued to believe he was on the right track and all forces were shifted toward the south.

When an armed reconnaissance by General Enrico Cialdini, commander of the Piedmontese fourth division, found minimal Austrian resistance at Vercelli the following day, the French Emperor and Italian King could see that Gyulai was shifting away from the north, giving them an opportunity to come at the Austrians from that direction. Garibaldi was also proving effective at keeping the Austrians off-balance. On May 26 at the Battle of Varese, his Cacciatori delle Alpi routed the Austrians, forcing them to keep more troops deployed in the north as the aggression of the Italians again caused the Austrians to overestimate their strength. The next day Garibaldi and his men defeated another Austrian contingent at the Battle of San Fermo, forcing the Austrians to withdraw from Como.

King Vittorio Emanuele rallies the Zouaves at Palestro
At the same time, while the largely French force was engaged at Montebello, King Vittorio Emanuele II led Cialdini’s division with the addition of some French Zouaves against a smaller contingent of Austrians under General Friedrich Zobel at the Battle of Palestro. The Austrians rushed in reinforcements so that, in the aftermath, they held the numerical advantage yet the threat of French troops on the Sesia caused him to retreat for fear of being cut off. By May 30 the Franco-Italian forces had secured a bridgehead across the Sesia. With efforts to retake Palestro having failed and with Garibaldi keeping control of the northern front in spite of being outnumbered nearly 4 to 1, Gyulai decided that the threat to Milan was too great and he ordered a retreat across the Ticino to concentrate his forces at Mortara. However, the rapid movements of the Franco-Italian armies forced him to abandon that plan. He was correct that they were moving against Milan, the capital of Lombardy, but he did not know what approach they would take. He was coming under intense pressure and no small amount of criticism, particularly after the arrival of Field Marshal Heinrich von Hess with stern orders from the Emperor (who had reached Verona) to defend the frontier and not retreat to the Quadrilateral fortress complex.

The Battle of Magenta
More Austrian reinforcements arrived and Gyulai was finally convinced that the enemy was not trying to maneuver around behind him after all. There was also confusion as Hess outranked Gyulai, yet seemed to be leaving things to him. All of this caused a degree of stagnation on the Austrian side as one commander would fail to do something because he assumed the other commander would do it. Nonetheless, the Austrians did hold a strong defensive position around Magenta after destroying the bridges over the Ticino. Gyulai had about 68,000 men in the area when the Battle of Magenta commenced on June 4. With a little over 50,000 French troops plus 12,000 Italians under General Manfredo Fanti, Napoleon III planned an assault on the front and flank of the Austrian army. The two sides were thus evenly matched as long as the Austrians concentrated on the points of attack and did not remain spread out. Both sides made mistakes and many units blundered into each other, nonetheless, the Austrians took far heavier losses and finally retreated, giving the victory to the French. Napoleon III congratulated Marshal MacMahon with a peerage as Duke of Magenta for this success.

This latest defeat was the last straw for Emperor Franz Joseph who had seen his forces do nothing but retreat, be outmaneuvered and defeated often by forces inferior to their own. He dismissed Gyulai and took command of the Austrian Imperial Army himself. With the Quadrilateral fortress cities secure but the enemy in command of the surrounding countryside, his position was similar to that of Graf Radetzky in 1848. However, “Papa Radetzky” was a veteran, unflappable commander and Emperor Franz Joseph was not. Determined to take the offensive and crush the enemy, he abandoned his strong position and moved out on June 23 to take on the Franco-Italian armies. The result was the bloody Battle of Solferino the following day. Once again both sides were about evenly matched with roughly 130,000 soldiers each.

Emperor Napoleon III at the Battle of Solferino
Each army was basically trying to attack the other and so units ran headlong into combat, often not as they intended. It was a huge brawl that involved a number of separate actions and coordination was difficult. The Austrian position was also undermined on distant fronts by uprisings breaking out in conjunction with Prince Jerome’s arrival in central Italy. Earlier, toward the end of May, his forces entered Florence and soon dispatched units to Parma and Modena. At Solferino, most of the fighting centered around two engagements, one around Solferino itself where the French under Forey pushed the Austrians back into the town itself at which point house-to-house fighting ensued. Despite Austrian reinforcements arriving, French attacks soon succeeded in nearly surrounding the town. Fighting south of town was disconnected from the main engagement and involved a number of cavalry units. There, the French attacks were repulsed by the Austrians but this had no effect on the imperiled Austrian position in town. The fighting was fierce and casualties were heavy, particularly for the Austrians.

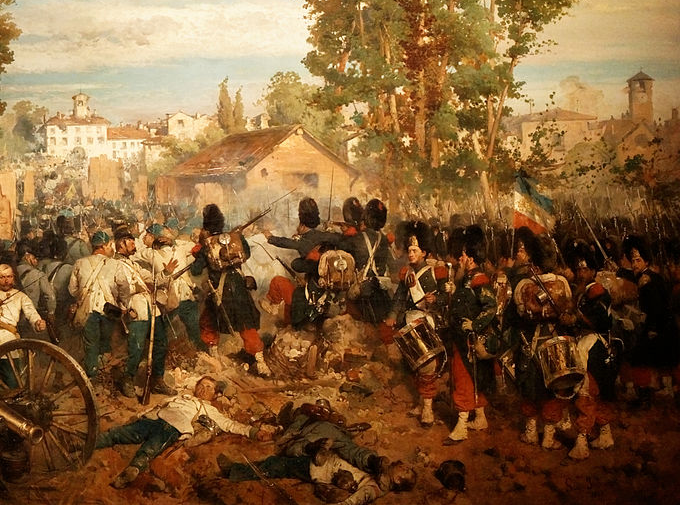
Battle of San Martino
The other major action was the battles at San Martino and Madonna della Scoperta which largely involved the Italian forces. The Austrians had a fairly good defensive position and the Italians attacked immediately, hoping to dislodge them before they could strengthen their lines. However, this meant that the Italians attacked piecemeal as they came up rather than being able to throw their entire force at the Austrian position. Field Marshal Lieutenant Ludwig Benedek, considered the best Austrian corps commander by many, had been ordered to attack the French flank and had not been expecting to run into the Italians. However, he was a veteran of this region and kept his cool, responding rapidly to the changing situation. Repeatedly, Italian discipline and determination carried them forward to the cusp of success only to have Benedek adeptly move his men and guns to the imperiled area and throw the Italians back with devastating barrages. However, when word came that the main Austrian army had been beaten at Solferino, he had no choice but to conduct a fighting withdrawal as the Italian attacks continued. With the French having taken Solferino, the Italian seizure of San Martino marked the end of the massive and bloody battle.

French & Austrian Emperors meet at Villafranca
Stunned by the ferocity and chaos of the engagement, Emperor Franz Joseph ordered his forces to fall back to the security of the Quadrilateral fortresses. Losses had been heavy for both sides. The Italians had lost about 5,000 men, the French more than 10,000 and the Austrians about 22,000 in the vicious struggle. Both the French and Austrian emperors were shaken by the extreme loss of life. The carnage would later lead one Swiss observer of the engagement to found the International Red Cross in 1863. Operations continued for a time but Napoleon III and Franz Joseph both agreed that the war should come to an end. Franz Joseph feared that a continuation of the so far disastrous conflict could pose an existential threat to the Austrian Empire itself if other areas rose in rebellion. Napoleon also feared that if Austria seemed near to collapse the other German states might get involved and threaten France itself. Disregarding his earlier promises to the Italians, Napoleon III agreed to make peace with Emperor Franz Joseph at Villafranca on July 8.

The result of this was that Austria gave up Lombardy to the House of Savoy but retained control of Venetia. It was not the total victory that Italian nationalists had wanted and many were bitter about the result. The French had gained Savoy and Nice but had backed out before the total liberation of northern Italy had been achieved. Many, given how close Austria had come to collapse in 1848, thought they would not put up so strong a fight. However, despite being weakened by budget cuts, the Austrian military was much more effective than Austrian diplomacy had been. Things would have gone very differently if the Austrians had not managed to offend the Russians, Prussians, the minor German states and the French all at the same time. Not only did this isolate Austria but it also gave the Prussians room to further gain prestige among the German states, standing as the defenders of German rights while Austria was focused on keeping control of Italians, Slavs and Magyars.

King Friedrich Wilhelm IV of Prussia
A particular example of this was in 1857 when royalists in the Principality of Neuchâtel had risen in revolt. They favored the King of Prussia for their prince rather than being a part of Switzerland and the German states saw this as an opportunity to strengthen the German Confederation. Emperor Franz Joseph, president of the Confederation as the Head of the House of Habsburg, had, however, refused to give their cause imperial support. Prussia was ultimately forced to back down and many in the German Confederation wondered why they should take any risk to support the Austrian rule over unwilling Italians two years later when the Austrians had been unwilling to support pro-German royalists who wanted to be ruled by a German monarch. It was illustrative of how Austrian interests diverged from those of the rest of the German-speaking people. There were also those in Berlin who realized the implications that Italian independence would have better than the French did. Napoleon expected to gain a subservient northern Italian buffer state but, as Modena, Tuscany, Parma and after Garibaldi’s shockingly successful invasion of the south, all came to be part of the Kingdom of Italy, France instead helped create a rival in the Mediterranean.

The result of all of this was that Austria lost Lombardy, which joined with Piedmont-Sardinia, Tuscany, Parma and Modena to form the Kingdom of Italy, soon joined by the south and the Papal States outside of Rome. Austria remained friendless and increasingly overshadowed by Prussia and the French were not seen by the Italians as stalwart allies but as rather fair-weather friends who likewise kept troops in Rome. The French had gained battlefield laurels but would also find themselves without friends going forward just as the Austrians had because of their determination to maintain some level of control over Italy, continuing a cycle which had been going on for many, many centuries and which would continue until the fall of Napoleon himself in 1870. Italy had gained much from the Second War for Independence but not so much as to not require a third war. The Austrian loss did not seem too significant but it actually was. In trying to maintain control of Italy, Austria would ultimately lose their place in Italy and their place at the had of Germany to the Kingdom of Prussia. It would be no coincidence then that the Third War of Italian Independence would see Italy and Prussia on the same side.

Saturday, June 17, 2017

Clash of Monarchies: The First War of Italian Independence

The idea of some sort of a unification of the Italian peninsula was one that long predated the series of wars for Italian independence. Indeed, unification and independence were not the same thing and might not necessarily have been linked. After the downfall of Napoleon and the re-drawing of the map of Europe by the Congress of Vienna, most of northern Italy was handed over to the Austrian Empire of the Habsburgs and their cadet branches of the family. Central Italy was restored to the Pope and the south of Italy was returned to the junior branch of the Spanish Royal Family. However, from the very beginning, there was trouble in the south and Austrian troops had to be dispatched to keep the King of the Bourbon Two-Sicilies on his throne. Between the north and the south, this meant that, fairly early on, Austria was forced to maintain a military force of over 100,000 soldiers on the Italian peninsula to maintain the existing power structure.

Metternich
The Austrian statesman, Prince Clemens von Metternich, knew this was unsustainable in the long-term and so proposed to the allies the creation of an Italian federation under the leadership of the King of Lombardy-Venetia, who not coincidentally happened to be the Emperor of Austria. The allies rejected this proposal and the unrest continued, particularly in the south. Metternich feared that this tendency toward rebellion would spread and threaten those areas recently placed under Habsburg rule. In response, he produced the “Troppau Protocols” in 1821 in which Austria, Prussia, France and Russia agreed that any outbreak of revolution would be met by concerted military force to suppress it. It was unlikely that such cooperation was to be forthcoming but Metternich hoped that the statement alone would be enough to convince potential rebels of the hopelessness of their cause and bolster the King in Naples in particular. To his frustration, however, such hopes by Metternich were dashed.

That same year, rebellions broke out in both Piedmont-Sardinia and the Two-Sicilies and Austrian troops were dispatched to both to suppress them. In Turin, the rebels did not try to bring down the monarchy but demanded a constitution, which Prince Carlo Alberto gave them, as he had taken control of the government when King Vitttorio Emanuele I abdicated in favor of his brother King Carlo Felice who was out of the country at the time. King Carlo Felice, with his loyal regiments and the Austrians, regained control of the country and restored the absolute monarchy, exiling Prince Carlo Alberto to France. In Naples, Austrian troops suppressed the rebels and restored King Ferdinando IV to power. This, however, only strengthened the hand of the radicals who argued against constitutional monarchy and in favor of radical republicanism. This faction was led by Giuseppe Mazzini who had no use for kings at all and would make great use in his propaganda for every time a monarch on the Italian peninsula granted a constitution at a time of weakness only to revoke it once they had an Austrian army behind them.

King Carlo Alberto & Kaiser Franz Joseph
This set the stage for the wars of Italian unification and independence. The momentum was toward that goal but the question remained whether it would be the radical republicans or the constitutional monarchists who reached the finish line first. The two most prominent monarchs involved would be the King of Piedmont-Sardinia, firstly King Carlo Alberto who came to the throne in 1831 and the Emperor of Austria Franz Joseph who would come to the throne in 1848. King Carlo Alberto, despite his earlier reputation, was a monarch of very traditional leanings and had fought, during his exile, for the legitimist cause in Spain as well as supporting other such legitimist causes elsewhere on the continent. He would give Piedmont-Sardinia (and by extension Italy as a whole in due time) her only monarchial constitution but it would be one that reserved considerable authority to the monarch. Nonetheless, once given, it would not be revoked and that garnered the House of Savoy a great deal of popularity. King Carlo Alberto also had a vision for a united Italy, independent of the Austrians but which would consist of a confederation of Italian princely states under the leadership of the Pope. However, the events of 1848 changed the situation and it became, again, a competition between the Italian nationalists who favored a republic and the Italian nationalists who favored a monarchy. King Carlo Alberto knew that if he did not succeed, Mazzini and his cohorts would.

1834 and 1838 had seen revolutionary outbreaks across Italy but in 1848 revolution began to sweep across multiple countries throughout Europe. In January the Sicilians rose up and overthrew the authority of the king in Naples, by March the Austrian Empire was engulfed in rebellion with uprisings in Milan, Venice, Budapest, Cracow, Prague and even Vienna itself. The regime of Kaiser Ferdinand was suddenly threatened by independence movements by the Hungarians in the east and the Italians in the west. In Milan, after five days of bitter struggle, the Austrian authorities were driven out while at the same time the Austrians were expelled from Venice in an uprising led by Daniele Manin. The Habsburg Grand Duke of Tuscany, the Habsburg Duke of Modena, the Bourbon King of the Two Sicilies and the Bourbon Duke of Parma were all forced by popular uprisings to grant constitutions. Likewise, in Rome, political reforms were demanded of Pope Pius IX who had initially favored the nationalist cause, to the point of liberating from prison and appointing to high office a succession of revolutionaries whom his predecessor, Pope Gregory XVI, had arrested.

Graf Radetzky
In Turin, King Carlo Alberto granted a constitution and was urged to take the lead in supporting the independence movement and driving the Austrians from Italian soil. He was very popular with the nationalists though the radical republicans of Mazzini’s faction naturally opposed him as the last thing they wanted was for a king of the most venerable Italian royal house to be the one to secure the unity and independence of Italy. Meanwhile, in Vienna, the Habsburg government was paralyzed and in need of leadership. Kaiser Ferdinand, handicapped from birth, was simply not up to the challenge. Moreover, the strength of the Austrian military had recently been reduced and now, suddenly, there were disasters in practically every part of the empire that needed to be dealt with so that Austrian military strength was severely overstretched. The one bit of good fortune the Austrians did have was the person of their commander on the ground in Italy; Field Marshal Joseph Graf von Radestky. He may not have been the most brilliant general but he was experienced, extremely competent and, most importantly, unflappable. He kept a cool head in the crisis when panic had gripped everyone around him.

So it was that with only 68,000 troops at his disposal and no immediate prospect for reinforcement for Radetzky that the Italian nationalists saw their chance and men such as Camillo di Cavour, Cesare Balbo and Massimo d’Azeglio urged King Carlo Alberto to take the lead and attack the Austrians before the republicans took control of the uprising. The King agreed and on March 29 led his small but highly proficient army of 28,000 men across the Ticino River with the aim of moving on Milan. With so many of their forces tied down all across Lombardy-Venetia trying to suppress rebellion, for the time being, the Austrian and Piedmontese forces would be about evenly matched. Further, as soon as word came that King Carlo Alberto had crossed the frontier, nationalist support for the Savoy monarchy erupted all across the Italian peninsula. Not wanting King Carlo Alberto to claim all the glory of liberating Italy for himself, Grand Duke Leopold II of Tuscany and King Ferdinando II of the Two-Sicilies likewise dispatched forces to join him in a joint war-effort against the Austrians. Even Pope Pius IX sent his support. The vision of independence and unification by way of a coalition of the princes of Italy seemed to be coming true.

Uprising in Milan
Brigadier General Guglielmo Pepe, a veteran of the Peninsular War and the Battle of Tolentino, commanded the Neapolitan contingent and, even more surprisingly, the Piedmontese and former Mazzinian General Giovanni Durando was given command of the Papal army by Pius IX. Altogether, a combined force of 100,000 Italian soldiers was moving or set to move against the beleaguered Austrians in the north. With such a force arrayed against them, the Austrian position seemed doomed. Any other commander would likely have lost his nerve but not Graf Radestky. He ordered his subordinates to fall back even as he pulled out of Milan. Yet, this was no disorderly retreat. Austrian commanders threatened horrific retaliation to remote areas of Lombardy-Venetia if any disturbances occurred, frightening most into taking no action. Radestky concentrated his forces in the Quadrilateral, the area within the fortresses of Verona, Mantua, Legnano and Peschiera. This would permit the Italian coalition no weak area to exploit. Thanks to the calm determination of Radetzky, the Austrians would soon discover that their position was not so vulnerable as it seemed.

On March 29, to great public fanfare, King Carlo Alberto entered Milan at the head of his troops. He marched on and his army pushed the Austrian rearguard across the Mincio River. The Austrian withdrawal caused the Piedmontese to push ahead before their allies from the south had arrived. Durando and the Papal Army was still south of the Po, Pepe and the Neapolitans were further north and the division from Tuscany was still on the march. King Carlo Alberto, seeing the Austrians retract, was determined to keep up the pressure on them and push forward, crossing the Mincio in mid-April toward Verona. On April 30 he met the Austrians at the Battle of Pastrengo and won a solid victory. Peschiera was besieged and the King was still pushing forward toward Verona. Graf Radetzky was finally compelled by this to take action and do something to take the initiative away from the Italians. An Austrian contingent was ordered to strike out from the city and on May 6 they administered a sharp sting at Santa Lucia that forced King Carlo Alberto to divert to the southwest of Verona, to Villafranca, to wait for further Piedmontese reinforcements and his allies from the south to join him.

Princely solidarity
At first, pan-Italian support only seemed to grow as the fight was underway. Nationalist sentiment in Parma and Modena forced their dukes to join the war effort. However, at this same critical moment, the expected help from the more significant states began to fall away. Tuscany remained pledged to the Italian cause but seemed unwilling to actually engage. Pope Pius IX suddenly sent an order to Durando forbidding him to cross the Po River, causing considerable bewilderment and likewise the commitment of King Ferdinando II of the Two-Sicilies seemed to fade away as April passed. A republican coup tried to unseat the King in Naples and disrupt the royal coalition. They failed at the first goal but succeeded in the second. King Ferdinando retracted the constitution he had earlier granted and recalled his army. General Pepe refused to go but most of the Neapolitan troops abandoned him. The remainder joined with the forces from Tuscany standing watch around Mantua. As for the Papal Army, General Durando argued with the Pope over his sudden about-face and finally simply disregarded the order and took his army across the Po anyway in an effort to cut off Radetzky from Venice.

Sardinian Grenadiers at Goito
Unfortunately for the Italians, Durando did not coordinate with King Carlo Alberto in these operations but the Austrian response of Graf Radetzky was, by contrast, extremely well coordinated. Field Marshal Lieutenant Count Nugent was dispatched with 16,000 men to stop the Italian advance in Venetia, hitting Durando at Cornuda and forcing him back to Vicenza. Throughout June, Durando and the Papal Army would remain there, surrounded by Austrian forces. This allowed Radetzky freedom to maneuver and while the Piedmontese remained at Villafranca, the Austrians flanked them with a march to Mantua. On May 29 they defeated the small contingent of troops from Tuscany and the 2,000 Neapolitan soldiers who had not abandoned Pepe at Curtatone-Matanara. Radetzky then moved his men from Mantua along the west bank of the Mincio with the aim of cutting off King Carlo Alberto from Piedmont. Unfortunately for the Austrians, King Carlo Alberto spotted this move and immediately grasped the enemy plan. He moved quickly to attack the Austrians while they were on the march and at the Battle of Goito on May 30, the Italians were victorious. Peschiera fell on the same day.

The Savoy star was still shining brightly, however, the situation was far from favorable. What little support that had been available from Tuscany, Naples and the Papal States was now completely gone and even with the many volunteers from across Lombardy and reinforcements from Piedmont, King Carlo Alberto had only 75,000 men which would be insufficient to launch a major offensive into Venetia or to mount a proper siege of the fortress cities of Mantua or Verona. King Carlo Alberto had no option but to remain at Villafranca and watch. At the same time, unflustered as usual, Graf Radetzky was methodically carrying on and was also finally receiving reinforcements from the rest of the Austrian Empire. The window of opportunity of Austrian weakness had closed on the Italians and Radetzky was able to launch a serious offensive of his own, descending on the Italians with two armies at the Battle of Custozza .

Austrian attack at the Battle of Custozza
This was the climactic engagement of the war, 33,000 Austrians against 22,000 Italians and the Italians fought valiantly against superior forces for three days from July 23-25. However, in the end, the Italians were forced to retreat. Yet, it was a fighting retreat, the Italians fell back in good order, continued to give resistance until disengaged, abandoned no equipment or anything of the sort. They had also inflicted considerably higher losses on the Austrians than they had suffered and the Austrians had not been able to decisively destroy the Piedmontese army. All the same, King Carlo Alberto would not waste the lives of his men needlessly and knew that without the whole of Italy standing together, he could not defeat the Austrians who would only grow stronger as his own forces grew weaker. The King had seen a chance but that chance was now gone and on August 9 he agreed to an armistice with the Austrians. In due course the Piedmontese abandoned Lombardy, returning to their own territory and the First War of Italian Independence came to an end. The following year, King Carlo Alberto did, briefly, attempt another effort but it was a short-lived disaster and, proud man that he was, this resulted in his abdication in favor of his son who became King Vittorio Emanuele II.

For the Austrians, the war had been one crisis among many. They had gained a new monarch in the young and determined Kaiser Franz Joseph, more laurels for a genuine war hero in Graf Radetzky and though they had come close enough to disaster to look it directly in the eye, that disaster had been averted and the Austrian Empire would survive, though ultimately concessions would be made to the Hungarians. Nothing of the sort would be forthcoming for the Italians however who continued to be ruled in the same manner that they had been before. The Kaiser even became somewhat cross with his younger brother, Archduke Ferdinand Maximilian, when, as Viceroy of Lombardy-Venetia, he attempted to win over the Italians rather than flog them into submission. There was even talk that the Archduke himself entertained thoughts of uniting the Italian peninsula himself. He was soon put in his place and made no more than a ceremonial figure so that he began to look toward Mexico for a place to prove himself. In short, despite coming so close to defeat, the Austrians were determined to change nothing in regards to Italy.

Abdication of King Carlo Alberto
As for the Italians, the First War of Independence was a major turning point. It represented the one and only time that the monarchs of the existing Italian states, no matter how enthusiastically, came together in common cause as one Italian people. The fact that this fell apart almost as soon as it came together meant that the vision of the more traditional nationalists of an Italian confederation of princely states would not come to be. Going forward, it would be the republicans or the House of Savoy alone who would have to see foreign rule ended on the Italian peninsula. The Savoy would take the lead, initially quite reluctantly, to prevent the republican vision from becoming reality and in the end even many republican nationalists would be swayed to the monarchist side because the Savoy had a record of success and the republicans had only a succession of failures. It would take at least two more wars before Italy was completely independent of foreign rule but the First War of Italian Independence clearly illustrated who would lead them and how they would be fought.

Monday, February 27, 2017

Clash of Monarchies: The Imjin War

The Imjin War (one of many names for the conflict, chosen here for its brevity) is not very well known outside of northeast Asia, yet it was a massive and significant conflict in world history. It represented a major challenge to the prevailing world order in East Asia, marked a shift in the history of Japan and the still tense relationship even today between the Japanese and Koreans. It principally involved three powers; the Empire of Japan, the Joseon Kingdom of Korea and the Empire of the Great Ming or China. Had it ended differently, the entire history of Asia would likely have been vastly different and building on that the history of the rest of the world would have unfolded differently as well. Of the three participants, Japan was a newly united country, forged in fierce civil conflicts, proud and ambitious. Korea was under relatively new leadership, still trying to assert its own place in East Asian politics and the Ming Empire of China was at its apex and the beginning of its decline. For the initial background, we must first look to Japan.

Emperor Go-Yozei (left), Emperor Wanli and the standard
of the King of Korea
The reunification of Japan, at the end of the “Warring States Period” is often helpfully described in terms of a house. Oda Nobunaga laid the foundation, Toyotomi Hideyoshi built the house and Ieyasu Tokugawa lived in the house. The famous warrior Oda Nobunaga had made the initial steps towards the reunification of Japan. Following his assassination, his cause was taken up by Toyotomi Hideyoshi, a man western historians would later nickname “the Napoleon of Japan”. He succeeded in uniting the warring states under his leadership though, being a self-made man of humble origins, he could never become Shogun. Nevertheless, he was given a title, sometimes translated as “Chancellor” or something similar, and he looked abroad to pursue his destiny. His dream was to conquer China and then India, taking control of the Silk Road and its lucrative trade, leading the Empire of Japan to dominate Asia. If this seems fantastic, remember that this was after Genghis Khan had taken the disparate tribes of Mongolia, united them into a single nation-state and led them to conquer China and then a larger empire that stretched from the Korean peninsula to Eastern Europe. Lord Hideyoshi, an ambitious man with many armies of samurai hardened by fierce battles among themselves, may well have thought to himself that if Genghis Khan of the Mongols could accomplish such a thing, so too could Toyotomi Hideyoshi of the Japanese.

Toyotomi Hideyoshi
For Japan to invade China, the only possible invasion route was the Korean peninsula where, not too long before, the Joseon Dynasty had seized power and had compensated for their lack of ancestral legitimacy by obtaining the recognition of the Ming Emperor in China as a vassal state. For the Chinese, this meant that Korea belonged to them but for the Koreans it meant nothing of the sort. They ruled their own country but, as with other neighbors of China, would pay tribute to the Ming court in exchange for trade and recognition. When the war came, Korea was ruled by King Seonjo, a man who worked to improve education and government in his kingdom. However, a diplomatic exchange of gifts with Hideyoshi gave the Japanese ruler the mistaken impression that the Koreans had voluntarily become vassals of Japan, which had not been the Korean intention. When he prepared to embark on his war against China, he invited and expected the Koreans to join him in this grand enterprise. Hideyoshi would be disappointed on this subject but King Seonjo also had other problems to deal with. Not only were there rival factions at court vying for power but the country was also divided north and south with the north worrying about the gathering strength of the Manchus and the south worrying about the growing power of Japan.

Japanese landing at Busan
On April 13, 1592 the first elements of the Japanese invasion landed at Busan with their commander, Konishi Yukinaga, sending a subordinate ashore first to ask one last time for Korean cooperation in their war with China. He was refused and the war began with the siege of Busan. Having obtained firearms from the Portuguese some time before and with an army of veterans of the fierce fighting of the “Warring States Period” the Japanese forces were far superior to the Korean defenders. Busan, Fort Dadaejin and the city of Dongnae fell to the Japanese in quick succession. More reinforcements followed and, though this is not often remembered, the Japanese invasion of Korea represented the largest amphibious assault in world history up to that time. The other Japanese divisions spread out and soon occupied Gyeongsang Province. The Koreans mobilized to meet the invasion with an army under General Yi Il, however, his archers proved no match for the ranks of Japanese musketeers and he was outmaneuvered as well. The resulting Battle of Sangju was a crushing defeat for the Koreans. They tried to regroup and stop the Japanese at the Battle of Chungju but again, Japanese firepower was devastating and the Koreans were defeated.

Konishi Yukinaga
The only major problem for the Japanese was that their victorious troops were advancing farther and faster than planned, causing some dissent among their commanders who accused the leaders of the initial wave of being glory hounds. King Seonjo fled from the capital of Hanseong (Seoul), which was soon captured by the Japanese and some Korean commanders, such as those charged with defending the Han River, retreated without resistance. The Koreans were forced into a massive retreat, doing their best to simply hamper and delay the Japanese as they fled north. At the Imjin River, which slowed the Japanese advance, the Japanese again called on the Koreans to stop resisting and join them in an attack on China but, once again, the Koreans refused. The King retreated to Pyongyang with the Japanese First Division pushing north behind him while other divisions fanned out to secure control of the rest of the Korean peninsula as they advanced. As city after city fell to Konishi Yukinaga of the First Division, he was joined for his advance on the northern Korean capital by the Third Division under Kuroda Nagamasa.

The Koreans tried to even the odds against them by launching a surprise night attack on the Japanese camp which was initially successful but which also exposed their position, allowing the Japanese to swing around and attack them from the rear. The escapade ended in chaos and as the Koreans retreated, the Japanese paid close attention to how they crossed the Taedong River, so they would know where to take their own forces across. When they made their advance on Pyongyang on July 20, 1592, they found that the King and remaining Korean forces had already retreated, leaving behind huge stockpiles of food and supplies. Meanwhile, the other Japanese divisions consolidated their hold on the Korean provinces, eliminating local resistance and establishing Japanese governors and administrators. Before the year was out, most of Korea had been conquered and the Japanese could look forward to their invasion of China, by way of the Jurchen territory, later known as Manchuria.

Yi Sun-Sin
All in all, 1592 had been a year of swift and decisive victories for Japan on the Korean peninsula. The Japanese armies had totally dominated the battlefield with superior weapons, superior tactics and greater skill. However, the Koreans were not without some victories of their own, it was only that these would not be won on land. Admiral Yi Sun-sin proved to be the most brilliant naval commander of his age in East Asia and in numerous battles totally defeated the Japanese whose ship designs and tactics were not as advanced as the Koreans. This had a major long-term impact on the conflict as it severely complicated the logistical situation for the Japanese armies. Things would, at one point in particular, get very bad for the Korean navy as the force was often cannibalized to make up for losses by the army, however, the Japanese were never able to defeat Admiral Yi Sun-sin. The one thing Admiral Yi Sun-sin is most famous for, certainly beyond Korea where he is a celebrated national hero to this day, is his innovative design known as the “Turtle Ship” (or Geobukseon).

Korean Turtle Ship
Today, any Korean will proudly tell you that the Turtle Ship was the first armored warship in the world. That, however, is an arguable point. The Japanese, namely Oda Nobunaga, had Tekkosen or “iron ships” in his naval arsenal, though these were more like armor plated floating fortresses rather than sea-going naval vessels. Before that, the Italian sailors of the Republic of Venice also had an armor plated flagship for their fleet. However, people can argue over bragging rights all they like but the armor was only one aspect of what made the Turtle Ships unstoppable. They were also completely enclosed and covered with spikes to repel borders. This was something that the Koreans had in common with the English ships who repelled the Spanish Armada. Admiral Yi Sun-sin designed his vessels to fight from a distance with naval cannon whereas other ships in those days were basically floating castles filled with soldiers which would ram each other and allow the warriors to fight for control of the vessel. The Japanese, more experienced at man-to-man combat, excelled at this and so, Admiral Yi Sun-sin wisely appreciated the strength of his enemy and had his ships fight with cannon rather than up close with swords. He would only go in for close combat against the Japanese when he had them severely outnumbered. As a result, the Koreans won battle after battle on the naval front.

Korean fleet
On September 1, 1592 Admiral Yi and his Korean fleet launched a surprise attack on the Japanese at Busan Bay in an effort to completely cut off from the Japanese armies in Korea from their home islands. It was an overwhelming tactical victory for the Koreans but did not change the strategic situation. The Korean fleet could not sustain itself in the area and had to withdraw, leaving Japan still in control of Busan. However, it did mean that the Japanese could not use the waterways to their advantage and this basically eliminated their plan of sending over more men and supplies for a full scale invasion of China and march on Peking. The Koreans also organized a highly effective guerilla warfare movement known as the “Righteous Army” which won a number of tactical victories against the occupying Japanese forces.

By the end of 1592 the Koreans had lost their country and King Seonjo was at the northern border seriously contemplating simply handing his entire kingdom over to China if only they would come to his rescue. The Ming Emperor Wanli, for his part, was rather overwhelmed by the news and shocked that the Japanese, a people the Chinese had always despised and looked down upon, could have conquered Korea so quickly. There had been some local assistance but it was not until January of 1593 that Emperor Wanli dispatched a major army to invade Korea and push the Japanese out. The King of Siam, another tributary of China, offered to attack the Japanese home islands but the Ming court refused the offer, not wanting to complicate the situation. On January 5, 1592 a Ming army of over 40,000, including a Korean contingent, arrived to besiege the 18,000 Japanese warriors garrisoning Pyongyang. Using a massive artillery and rocket bombardment, the Chinese inflicted over a thousand casualties on the Japanese but had purposely neglected to completely encircle the city so as to allow the Japanese the chance to escape rather than fight to the death. Under cover of darkness, the Japanese finally withdrew and Pyongyang was retaken.

Tachibana Muneshige, Japanese commander at
the Battle of Byeokjegwan (1 of 3)
This made the Chinese rather overconfident and they continued their offensive south only to be met with a stinging defeat at the hands of the Japanese at the Battle of Byeokjegwan. Despite having a near 2-to-1 superiority in numbers, the Chinese were defeated and suffered heavy casualties, proving to them for the first time just how formidable a foe the Japanese were and, perhaps, making them understand why the Koreans had had so much trouble. The Japanese tried to follow this up but were themselves defeated by the Koreans at the Battle of Haengju on February 12, 1593. This was significant even if only as a morale-booster for the Koreans, proving, under the leadership of General Kwan Yul, that they could beat the Japanese in a defensive battle with carefully prepared fortifications and the proper weaponry. Later, as the Ming and Korean armies moved, more slowly and cautiously this time, south toward Seoul, a team of saboteurs were sent in who destroyed much of Japan’s military stockpiles in the city. This, combined with Korean naval pressure on their supply lines, convinced the Japanese to withdraw from Seoul and agree to negotiate for peace. The Chinese, after their bloody loss at Byeokjegwan, were also eager to end the war.

Unfortunately, each side thought the other was suing for peace and basically trying to surrender and this, naturally, was not conducive to ending the war. The Chinese thought that the Japanese had agreed to withdraw and submit again to the Ming Emperor as their overlord (Hideyoshi having previously stopped paying tribute to the court in Peking) while Hideyoshi thought that the Chinese were surrendering to him and demanded territorial concessions as well as a Ming princess to be married to the Japanese Emperor Go-Yozei. Neither was true and when each side refused the demands of the other, hostilities resumed after several years of back and forth between the two sides. However, with the resumption of hostilities, the overall strategy and goals of the war, at least for Japan, would be dramatically different than they had been originally. With the huge numbers of Chinese troops moving east, Hideyoshi realized that the conquest of the Ming Empire was hopeless, at least for the moment and so would instead focus on simply retaking and holding the Kingdom of Korea as a Japanese foothold on the Asian mainland, a tributary state and a possible base for future, more ambitious operations.

Kobayakawa Hideaki
This would impact how the war was fought as previously the Japanese had made at least some effort to win over the Koreans to their side. They hoped all along that the Koreans would simply accept Japan as their new overlord and join them in the conquest of China. Now that the conquest of China was off the table and control of Korea was the only immediate goal, Japanese forces became rather less considerate, to put it mildly, toward the Koreans. It also made a difference that during the years of diplomatic exchanges between Japan and China, the Koreans worked feverishly to rebuild and improve their military capabilities. As a result, when the war resumed, the Japanese found them a much more capable opponent and a dangerous enemy is much less likely to receive mercy than an easily beaten foe. Though more limited, the fighting would often be even more intense. Unlike the first invasion force which, though estimates vary, numbered over 200,000 Japanese troops, the second invasion force would number just over 100,000 under the overall command of Kobayakawa Hideaki, the nephew and adopted son of Hideyoshi.

This invasion force, carried by a fleet of 200 ships, landed in southern Korea unopposed in 1597 and began taking control of Gyeongsang Province. The Ming Emperor Wanli gathered a relatively modest force by Chinese standards with naval support to send to Korea under the command of General Yang Hao, who would have a less than upstanding career. Along with his 75,000 Chinese troops, the Koreans would muster about 30,000 in four armies plus the naval forces. The great Admiral Yi Sun-sin was available but his success aroused jealously at court and a smear campaign of sorts was launched against him until he was dismissed by King Seonjo and replaced by Won Gyun. The new admiral immediately sought out the Japanese fleet and attacked them at the Battle of Chilcheollyang. The result was possibly the biggest and most decisive Japanese naval victory of the entire war. Won Gyun was totally defeated, was himself killed in the battle and the Korean flagship was captured. The Japanese won complete mastery of the area and were able to continue landing men and supplies for the invasion force unimpeded.

The Battle of Myeongnyang
Korean morale was wounded by this disaster and their defenses began to crumble as the Japanese launched a determined offensive northward. The fortress of Namwon fell, then Hwangseoksan fortress fell with the defenders retreating almost immediately. Ming Emperor Wanli was furious that the Japanese were again advancing on Seoul, reshuffled his military high command and sent General Yang Hao to take charge of Korea. However, the situation was beginning to turn around. At the Battle of Jiksan on September 7, 1597, although the Japanese won something of a tactical victory, the Ming army was able to block their advance. Also, after the disastrous loss at Chilcheollyang, King Seonjo of Korea stopped listening to the critics and restored Admiral Yi Sun-sin to his old command and the result was a swift turnaround. At the Battle of Myeongnyang he defeated a massive Japanese fleet in what is certainly his most famous and celebrated victory. The scale of the success was incredible and was due almost entirely to the Admiral’s skillful placement of his ships and his knowledge of the local waters.

Attack on Ulsan castle
With their supply lines imperiled and the Ming armies blocking their path north, the Japanese began to fall back, almost always under harassing attacks by Chinese and Korean forces. The Japanese would give battle when necessary and were never beaten in these attacks but were steadily pushed back by them. A really decisive battle seemed in place at the Siege of Ulsan which lasted from December 23, 1597 to January 4, 1598. The Chinese and Korean forces numbered  around 55,500 men whereas the Japanese garrison was only 10,000 with only 13,000 more troops near enough to come to their aid. The Japanese held off these superior forces, despite being nearly starved to death for lack of supplies due to Korean naval dominance of the coast but at the approach of the Japanese reinforcements the Ming General Yang Hao completely lost his nerve and ordered a retreat. Seeing an opportunity, the Japanese forces in Ulsan castle burst out from their fortifications to attack and the result was a humiliating panicked retreat by the Sino-Korean forces. In the disastrous battle the Chinese and Koreans had lost 20,000 men killed while the Japanese dead numbered only a little over 1,000. Later, another Sino-Korean force would try to take Ulsan castle and would again be defeated in September though there was at least no panic and the retreat was orderly.

This resulted in a prolonged period of stalemate and an ‘America in Vietnam’ type situation for Japan. Despite winning the major land battles, their loss at sea meant that supplying men and material for an offensive or even a large defensive force was simply impossible and Japanese forces began to be withdrawn from Korea. A renewed Sino-Korean offensive failed to achieve a major breakthrough but nonetheless kept up an unrelenting pressure on the Japanese whose logistics were extremely strained. At the Battle of Sacheon the Sino-Korean offensive was defeated and the Japanese again launched a successful counter-attack and likewise at the Siege of Suncheon a little under 14,000 Japanese troops under Konishi Yukinaga successfully repelled a Sino-Korean attack by 50,000 men with heavy losses, yet these victories did not change the overall strategic situation. The stalemate simply dragged on until September 18, 1598 when Lord Hideyoshi in Japan died. Everyone knew, despite his efforts to secure the succession of his son to his position, that all the daimyo would soon be fighting for power in Japan and so the ruling council ordered a total withdrawal from Korea while keeping the news of the death of Hideyoshi secret in order to preserve Japanese morale.

Japanese fleet
The only major subsequent engagement was the Battle of Noryang Point which was a tactical victory for Korea but a strategic victory for Japan in that they were still able to continue their evacuation. Worse for Korea was the death of Admiral Yi Sun-sin in this battle along with the Ming commander Deng Zilong. Negotiations for the final peace settlement would drag on for some time, long after the power struggle in Japan had been ended with the famous Tokugawa Ieyasu becoming Shogun and establishing the reign of the Tokugawa shogunate which would survive until the Meiji Restoration. Both sides were so entrenched that it took an act of deception, making the Koreans believe the Japanese had submitted to their demands when, in fact, they had not, to formally end the war and reestablish normal relations between the two countries.

In retrospect, the Imjin War was extremely significant for the course of the history of northeast Asia and beyond. It weakened the Toyotomi clan of Hideyoshi and helped enable the Tokugawa in seizing power in Japan. It solidified the place of Korea as a vassal of China and reaffirmed prejudices against Japan in their regard that would prove disastrously mistaken over the course of history. Had the war gone differently, had Hideyoshi been satisfied in his ambition to conquer the Ming empire, India and control of the Silk Road, the entirety of Asian history would have been drastically changed. All sides came away feeling rather justified in their own sense of accomplishment. The Empire of the Great Ming had retained the Sino-centric status quo of the existing international order. The Koreans had expelled the invaders of their country after a long and bitter struggle and even the Japanese could boast of having dominated their enemies on the land and withdrawn from the conflict without suffering a major, decisive defeat on the battlefield. All of these sentiments would have an impact on how these countries developed in the centuries to come.
Related Posts Plugin for WordPress, Blogger...